In an earlier post, I presented code to "print" to a PDF file from a Pageable. Since then I have added the ability to concatenate multiple Pageables into a single PDF file, with the option for bookmarks. The previous code was modified and some things renamed.
A small interface, PDFBookmarker, was added.
The previous class, PDFPrinter, was renamed PDFStream (mainly to keep it different). The new class takes an OutputStream in the constructor, since it may be shared across multiple prints.
The key method, which was called printToPdf(), is renamed to the clearer appendToPDF().
A few new methods, such as newPage() and close(), were added, so you can control output in between prints, and at the end.
The two java files are available via Assembla, at http://www.assembla.com/code/hastur/subversion/nodes/trunk/Hastur_J/src/com/flyingspaniel/pdf
This code requires the wonderful iText library, either 2.1.7 or 5. Enjoy!
Friday, June 29, 2012

Friday, June 15, 2012
How to Parallelize your Algorithm with an ExecutorService. Part 1, the "Happy Path"
Let's say you have a long running algorithm to calculate stuff, for example, the median and 99th
percentile (and other percentiles) of IRS income data. This is slow because calculating medians and percentiles typically requires sorting data, and there's a lot of IRS data. Your method looks like:
  public static PercentileResults calcPercentileResults (IRSData irsData, int year, Options options) {
     BigObjectLotsOfData = irsData.getData(year, options);
     // big calculation here
     return percentileResults;
  }
You always need a year. Options represents optional complex things such as "only Married filingjointly", "only ages 55-65", etc. PercentileResults is a Business Object with the results. Currently, the code calls this in serial and puts results into a Map:
  for (int year = 2000; year <= 2011; year++) {
     PercentileResults result = calcMedianAnd99(irsData, year, options);
     resultsMap.put(year, result);
  }
Obviously calculations for different years (and Options) can be done totally independently in parallel. An ExecutorService helps manage this for you. Most of the ExecutorService methods want a Callable, so the first step is to convert your class into a callable. Here's a first pass: public class CallableCalculation implements Callable<PercentileResults> {
public final IRSData irsData;
public final int year;
public final Options options;
public CallableCalculation(IRSData irsData, int year, Options options) {
this.irsData = irsData;
this.year = year;
this.options = options;
}
@Override
public PercentileResults call() throws Exception {
BigObjectLotsOfData bolod = irsData.getData(year, options);
PercentileResults result = new PercentileResults();
// big calculation here that sets stuff in PercentileResults
bolod = null; // important to free this memory
// placeholder for Option 1 and 2 (see below)
return result;
}
}
For simplicity, I made all the values public final so that they could be accessed later. If you don't like this style, make them private and add accessors as desired. More on this later...
The simple way to call this in parallel would be:
 public Map<Integer, PercentileResults> calculateInParallel(Options options) throws Exception {
   IRSData irsData = IRSData.getInstance();
   HashMap<Integer, PercentileResults> resultMap = new HashMap<Integer, PercentileResults>();

   ArrayList<CallableCalculation> tasks = new ArrayList<CallableCalculation>();

   for (int year = 2000; year <= 2011; year++) {
      CallableCalculation cc = new CallableCalculation(irsData, year, options);
      tasks.add(cc);
   }
   int processors = Runtime.getRuntime().availableProcessors();
    //might want to adjust that number some...
   ExecutorService myService = Executors.newFixedThreadPool(processors);

   // oops - there's a problem coming up
   List<Future<PercentileResults>> results = myService.invokeAll(tasks);
   for (Future<PercentileResults> future : results) {
      PercentileResults pr = future.get();

      resultMap.put(year, pr);  // oops, what's the year for that Future???
   }

   return resultMap;
 }
Now, there's one "gotcha" so far. The input parameter year has gotten separated from the results.
There's a few options.
1) If the final location is really really clear and obvious, the algorithm itself could put the results
there. In this example, before returning the result (see comment "placeholder"), just put the results
into the Map. This is a simple solution but not very robust to changes in requirements.
2) Add the year as a new field to PercentileResults, and set it (at placeholder spot). This is robust.
But tedious and violates DRY. What if there are lots of settings you want to remember? Like all the
Options? And maybe you don't want to clutter your XXXResults with the input settings. Or you can't - it's taken from some third party library.
3) The option I like best it to return the CallableCalculation! It already holds all the settings. You just need to add a field for the results, and relevant accessors. So you aren't doing much extra work. Your class would look like this (changes noted by "NEW")
public class CallableCalculation implements Callable<CallableCalculation> {

   public final IRSData irsData;
   public final int year;
   public final Options options;

   PercentileResults results;  // NEW

   public CallableCalculation(IRSData irsData, int year, Options options) {
      this.irsData = irsData;
      this.year = year;
      this.options = options;
   }

   public PercentileResults getPercentileResults () { return results; }  // NEW

   @Override
   public CallableCalculation call() throws Exception {

      BigObjectLotsOfData bolod = irsData.getData(year, options);
      results = new PercentileResults();
      // big calculation here that sets stuff in PercentileResults
      bolod = null; // important to free this memory
      return this; // NEW
   }

}
and the calling method, in place of the "oops - there's a problem coming up" section has:List<Future<CallableCalculation>> results = myService.invokeAll(tasks);
for (Future<CallableCalculation> future : results) {
CallableCalculation cc = future.get();
resultMap.put(cc.year, cc.getPercentileResults());
}
In a future post we will consider the unhappy path with errors and Exceptions.
Sunday, April 29, 2012
From java.awt.print.Pageable to PDF
My current project has implemented multi-page printing, with headers and footers and all that. It's complex. We use some of the ideas from Stanislav Lapitsky and his series of articles about a PaginationPrinter. If a user wants the printouts not on paper, but as PDF files, we suggest that they use a free utility like CutePDF. (there are alternatives)
However, CutePDF is Windows only, and it's a couple of extra steps as they have to remember to select the correct "printer", then enter a filename. Also, there may be a future need to append output from a collection of data into a single output PDF file.
So, a cross-platform, java-centric way to "print" our results by creating a PDF file would be a good option. Fortunately, iText offers everything we need, in fact, way more than we need, and you can get an excellent book iText in Action.
Some Googling for help was tricky, cause, if you Google for something like "java print PDF" you get lots of links on how to open and print an existing PDF document. We want to create a PDF document. More searching led to an excellent blogpost by Gert-Jan Schoeten, "From java.awt.print.Printable to PDF". You would not do too poorly by skipping the rest of my blog and just going to his. However, by using more information from Pageable and Printable you can slightly simplify his code. The way I set things up and return the results is, IMO, slightly preferable, but still largely a matter of style. I am largely glossing over the whole FontMapper issue as well, since my project uses only basic fonts.
Here's the code:
Hope this helps out some of you who wish an easy way to create PDF files from Swing components.
Note that this code as written works in iText 2.1.7, but, with just changes to the imports it also works with iText 5.2.1. The version 5 is obviously more "up to date" but the licensing has changed. I don't blame Bruno Lowagie for trying to make some money from his great efforts. Here's a largely civil discussion on the matter.
However, CutePDF is Windows only, and it's a couple of extra steps as they have to remember to select the correct "printer", then enter a filename. Also, there may be a future need to append output from a collection of data into a single output PDF file.
So, a cross-platform, java-centric way to "print" our results by creating a PDF file would be a good option. Fortunately, iText offers everything we need, in fact, way more than we need, and you can get an excellent book iText in Action.
Some Googling for help was tricky, cause, if you Google for something like "java print PDF" you get lots of links on how to open and print an existing PDF document. We want to create a PDF document. More searching led to an excellent blogpost by Gert-Jan Schoeten, "From java.awt.print.Printable to PDF". You would not do too poorly by skipping the rest of my blog and just going to his. However, by using more information from Pageable and Printable you can slightly simplify his code. The way I set things up and return the results is, IMO, slightly preferable, but still largely a matter of style. I am largely glossing over the whole FontMapper issue as well, since my project uses only basic fonts.
Here's the code:
package com.flyingspaniel.pdf;

import java.awt.Graphics2D;
import java.awt.print.PageFormat;
import java.awt.print.Pageable;
import java.awt.print.Printable;
import java.awt.print.PrinterException;
import java.io.IOException;
import java.io.OutputStream;


// if you change to iText v5 these imports change to com.itextpdf...

import com.lowagie.text.Document;
import com.lowagie.text.DocumentException;
import com.lowagie.text.Rectangle;
import com.lowagie.text.pdf.DefaultFontMapper;
import com.lowagie.text.pdf.FontMapper;
import com.lowagie.text.pdf.PdfContentByte;
import com.lowagie.text.pdf.PdfWriter;

/**
 * With this class, you can print a {@link Pageable} to a pdf
 *
 * @author Morgan Conrad
 *
 * Based upon earlier work by
 * @author G.J. Schouten
 * @see http://www.zenbi.co.uk/2011/09/04/printable-to-pdf/
 *
 * Using the wonderful iText library.  This version is built for version 2.1.7 but
 * it will work, with changes to the import statements, with iText 5.2.1
 * @author Bruno Lowagie
 * @see http://itextpdf.com/
 */

public class PDFPrinter {

   protected final FontMapper fontMapper;

   static DefaultFontMapper sDefaultFontMapper = null;
   static String sFontDirectory = "C:/windows/fonts";

   /**
    * Constructor
    * @param fontMapper if null, uses the DefaultFontMapper
   */

    public PDFPrinter(FontMapper fontMapper) {
      this.fontMapper = fontMapper != null ? fontMapper : getDefaultFontMapper(sFontDirectory);
    }

   /**
    * Default constructor, uses the DefaultFontMapper
    */

   public PDFPrinter() {
     this(getDefaultFontMapper(sFontDirectory));
   }

   /**
    * Change the directory for fonts. (OS dependent)
    * Generally, one should call this *before* ever instantiating a PDFPrinter
    *
    * @param fontDirectory
    */

    public static synchronized void setFontDirectory(String fontDirectory) {
       sFontDirectory = fontDirectory;
       sDefaultFontMapper = null;  // force getDefaultFontMapper to recalculate...
   }


   private static synchronized FontMapper getDefaultFontMapper(String fontDirectory) {
      if (sDefaultFontMapper == null) {
         sDefaultFontMapper = new DefaultFontMapper();
         if (sFontDirectory != null)
            sDefaultFontMapper.insertDirectory(sFontDirectory);
       }

       return sDefaultFontMapper;

   }

   /**
    * Creates a PDF from a Pageable
    * @param pageable
    * @param os
    * @param closeStream whether to close the stream.
    *                    Since we don't create the stream, best practice is to leave this false
    * @return number of pages actually printed
    *
    * @throws IOException
    * @throws PrinterException
   */

   public int printToPdf(Pageable pageable, OutputStream os, boolean closeStream) throws IOException, PrinterException {

      // sanity check
      if (pageable.getNumberOfPages() == 0)
         return 0;

      // base page sizes on the first page
      PageFormat pageFormat = pageable.getPageFormat(0);
      float width = (float)pageFormat.getWidth();
      float height = (float)pageFormat.getHeight();
      Rectangle pageRect = new Rectangle(0.0f, 0.0f, width, height);

      Document document = new Document(pageRect);
      PdfWriter writer;

      try {
         writer = PdfWriter.getInstance(document, os);
      } catch (DocumentException e) { // don't throw as an iText exception so other classes don't need links to iText classes
         throw new RuntimeException(e);
      }

      writer.setCloseStream(closeStream);
      document.open();

      PdfContentByte contentByte = writer.getDirectContent();

      int pageIdx = 0;
      int pageStatus;

      do {

         if (pageIdx > 0)
            document.newPage();

         // The following is deprecated in iText5 but works

         Graphics2D g2d = contentByte.createGraphics(width, height, fontMapper);
        // if you are using iText5 and want to be "up to date", use
        // Graphics2D g2d = new PdfGraphics2D(contentByte,  width, height, fontMapper);

         Printable printable = pageable.getPrintable(pageIdx);
         try {
            pageStatus = printable.print(g2d, pageFormat, pageIdx);
         } finally {
            g2d.dispose();// iText in Action book says this is very important, so put in a finally clause...
         }
      }
      while ((pageStatus == Printable.PAGE_EXISTS) && (++pageIdx < pageable.getNumberOfPages()));

      document.close();
      writer.close();
      os.flush();

      return pageIdx;

   }

}
Hope this helps out some of you who wish an easy way to create PDF files from Swing components.
Note that this code as written works in iText 2.1.7, but, with just changes to the imports it also works with iText 5.2.1. The version 5 is obviously more "up to date" but the licensing has changed. I don't blame Bruno Lowagie for trying to make some money from his great efforts. Here's a largely civil discussion on the matter.
Wednesday, January 18, 2012
A Brief Detour into JavaScript, XHTML, and HTML5
We will return to Ubuntu and Hadoop later...
My wife helps maintain a website for a volunteer organization, and I am powerless to help much because, despite years of programming, I have essentially zero knowledge of JavaScript and XHTML. Sure, I've read some JavaScript and XHTML, but all writing has been like my SQL "writing": take some existing code, make an extremely minor change, and hope for the best. What I saw of XHTML just felt "strange". Not as bad as early editions of J2EE, with Factories, FactoryFactories, and FactoryFactoryStrategies, (o.k., I'm kidding some) but pretty bad.
But, it would be useful to actually know a bit more. Also, I want to learn HTML5, so it seemed like a good time to learn some basics of JavaScript and XHTML. So, to get started, I visited the local library and checked out JavaScript and AJAX for Dummies by Andy Harris. I already own a couple of HTML5 books.
From Andy's book, here is the XHTML version of the classic "Hello World" program. I have removed all the < and > cause they screw up blogger.
!DOCTYPE html PUBLIC "-//W3C//DTD XHTML 1.0 Strict//EN"
"http://www.w3.org/TR/xhtml1/DTD/xhtml1-strict.dtd"
html lang="EN" dir="ltr" xmlns="http://www.w3.org/1999/xhtml"
head
meta http-equiv="content-type" content="text/xml; charset=utf-8" /
titleHelloWorld.html/title
script type = "text/javascript"
//![CDATA[
// Hello, world!
alert("Hello, World!");
//]]
/script
/head
body
/body
/html
My wife helps maintain a website for a volunteer organization, and I am powerless to help much because, despite years of programming, I have essentially zero knowledge of JavaScript and XHTML. Sure, I've read some JavaScript and XHTML, but all writing has been like my SQL "writing": take some existing code, make an extremely minor change, and hope for the best. What I saw of XHTML just felt "strange". Not as bad as early editions of J2EE, with Factories, FactoryFactories, and FactoryFactoryStrategies, (o.k., I'm kidding some) but pretty bad.
But, it would be useful to actually know a bit more. Also, I want to learn HTML5, so it seemed like a good time to learn some basics of JavaScript and XHTML. So, to get started, I visited the local library and checked out JavaScript and AJAX for Dummies by Andy Harris. I already own a couple of HTML5 books.
From Andy's book, here is the XHTML version of the classic "Hello World" program. I have removed all the < and > cause they screw up blogger.
!DOCTYPE html PUBLIC "-//W3C//DTD XHTML 1.0 Strict//EN"
"http://www.w3.org/TR/xhtml1/DTD/xhtml1-strict.dtd"
html lang="EN" dir="ltr" xmlns="http://www.w3.org/1999/xhtml"
head
meta http-equiv="content-type" content="text/xml; charset=utf-8" /
titleHelloWorld.html/title
script type = "text/javascript"
//![CDATA[
// Hello, world!
alert("Hello, World!");
//]]
/script
/head
body
/body
/html
Now, I'm a Java programmer and used to some verbosity, but this really pushed the limits. Speaking as a complete outsider from Mars looking at this, what the Heck were they thinking? There's the !DOCTYPE tag that I guess you just get used to typing, or copy from a pre-existing file. Same for the HTML lang="en" etc...
There's the meta tag. What's that even mean? That I'm UTF-8 and text/xml. I know about internationalization, where it might not be UTF-8. But I already said that I'm English via lang="EN". And UTF-8 is the natural encoding for English, should be the default, shouldn't it? Again, what were they thinking?
Finally, the really mysterious //CDATA stuff. Now, CDATA means "Character data". If the XML wizards are going to force me to write 174 characters (for the DOCTYPE and html tags) just to get started, why are they suddenly trying to save a few characters here??? Just call it CHARACTER_DATA or whatever. Secondly, why is this commented out??? I think I finally understand, it's commented out with "//" so that JavaScript will ignore it. And, fortunately, XML parsers do not use "//" for comments so they will not ignore it. What a hack! Now, I'd probably appreciate the hack in some deep part of the Java Runtime or the Linux kernel. But as something out in the open that everybody is supposed to use around every JavaScript, all I can say, yet again, is what were they thinking? It's quite obvious that whoever wrote the XHTML standard had no thought for usability, elegance, or thought. Whenever they saw a hoop for coders to jump through, they added two just to make sure. I expect someday to see it revealed that XHTML was actually a social experiment like the Stanford Prison Experiment - given a big-shot committee, just how much pain and agony will users tolerate?
By contrast, here is the HTML5 version. (Again, < and > removed)
!DOCTYPE HTML
html
head
titleHello World/title
script type="text/javascript"
alert("Hello World");
/script
/head
body
/body
/html
html
head
titleHello World/title
script type="text/javascript"
alert("Hello World");
/script
/head
body
/body
/html
Notice something? All that crap is gone! Wonderful.
As it turns out, my wife might want a Calendar thingamabob on her page. You can find lots of JavaScript code to do this. I found some code, a mere 220 lines long (sarcasm intended), that you can cut and paste into your page. With HTML5, you can do it with 0 lines of code: just say input type="date".
In conclusion, I am exceeding glad that I never bothered to learn XHTML. I hope to remain, as much as possible, proudly ignorant of XHTML. HTML5 has made an instant convert.
Tuesday, January 3, 2012
Adventures in Ubuntu and Hadoop Part 4
Let's recap Rocky and Bullwinkle's adventures with Hadoop and Ubuntu on an old desktop computer. They fairly easily installed Ubuntu, Java and Eclipse, then installed an SSH server and set the ip4 address, and then, in their greatest adventure, finally got X-Windows (and VNC) working. Now we are finally ready to install Hadoop. I plan to follow the blog post by Michael Noll and the O'Reilley Hadoop book by Tom White (esp. Appendix A). According to Michael Noll, I have more that satisfied the prereqs.
Recent Hadoop releases are here or here. Some strange domain names. As of today 0.20.203 was the latest stable release, so I grabbed it and put it in /opt/hadoop. Then, per Michael's instructions
sudo tar xzf hadoop-0.20.203.0rc1.tar.gz and sudo chown -R hduser:hadoop hadoop-0.20.203.0
Then edit /home/hduser/.bashrc (don't forget to type sudo!) to add the following lines at the end. YMMV depending on exactly where your Hadoop and Java are installed.
# Set Hadoop-related environment variables
export HADOOP_HOME=/opt/hadoop/hadoop-0.20.203.0
# Set JAVA_HOME
export JAVA_HOME=/opt/java/32/jdk1.6.0_30
# Add Hadoop bin/ directory to PATH
export PATH=$PATH:$HADOOP_HOME/bin
The Hadoop book suggests that you test if it will run by typing hadoop version. Before this will work,either re-login to run the .bashrc script, or manually do all three exports. If you forget to export JAVA_HOME, you'll see a useful, informative message
Error: JAVA_HOME is not set.
But, once you set all three, you'll see something like
mpc@mpc-desktop:/home/hduser$ hadoop version
Hadoop 0.20.203.0
Subversion http://svn.apache.org/repos/asf/hadoop/common/branches/branch-0.20-security-203 -r 1099333
Compiled by oom on Wed May 4 07:57:50 PDT 2011
Wohoo! Our work is done! Well, not really, there's still a whole bunch to go, like configuring the Hadoop Distributed File System. (HDFS). But, let's declare victory for now and return to that on a later day.
Recent Hadoop releases are here or here. Some strange domain names. As of today 0.20.203 was the latest stable release, so I grabbed it and put it in /opt/hadoop. Then, per Michael's instructions
sudo tar xzf hadoop-0.20.203.0rc1.tar.gz and sudo chown -R hduser:hadoop hadoop-0.20.203.0
Then edit /home/hduser/.bashrc (don't forget to type sudo!) to add the following lines at the end. YMMV depending on exactly where your Hadoop and Java are installed.
# Set Hadoop-related environment variables
export HADOOP_HOME=/opt/hadoop/hadoop-0.20.203.0
# Set JAVA_HOME
export JAVA_HOME=/opt/java/32/jdk1.6.0_30
# Add Hadoop bin/ directory to PATH
export PATH=$PATH:$HADOOP_HOME/bin
The Hadoop book suggests that you test if it will run by typing hadoop version. Before this will work,either re-login to run the .bashrc script, or manually do all three exports. If you forget to export JAVA_HOME, you'll see a useful, informative message
Error: JAVA_HOME is not set.
But, once you set all three, you'll see something like
mpc@mpc-desktop:/home/hduser$ hadoop version
Hadoop 0.20.203.0
Subversion http://svn.apache.org/repos/asf/hadoop/common/branches/branch-0.20-security-203 -r 1099333
Compiled by oom on Wed May 4 07:57:50 PDT 2011
Wohoo! Our work is done! Well, not really, there's still a whole bunch to go, like configuring the Hadoop Distributed File System. (HDFS). But, let's declare victory for now and return to that on a later day.
Saturday, December 31, 2011
Adventures in Ubuntu and Hadoop Part 3
Wherein Rocky and Bullwinkle install PuTTY and XMing to allow X-Windows access to the Ubuntu machine, or, "Maybe I'll use VNC instead".
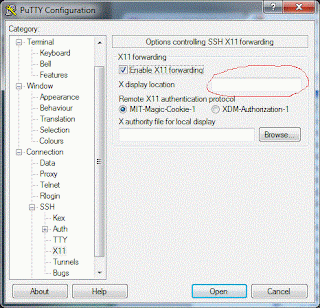
All in all, PuTTY is a great little program.
When I used Unix a lot (20+ years ago) I was using X-Windows. I remember when Tom's Window Manager (twm) was hot stuff. So I wanted to run an X "server" (poor choice of terms but that's what they call it) on my Windows laptop. The first step is to download and install PuTTY, a highly-regarded telnet and SSH client. Be sure to get the latest release version 0.61 or higher if you are using Windows 7. PuTTY is pretty simple to use: double click on putty.exe, you'll see a (somewhat complex) dialog for the configuration. And you'll notice that on-line documentation it a bit inconsistent on how to configure it for XWindows. Mainly on the Connection-SSH-X11 page. I left it blank, as many (also see PuTTY docs) suggest.
XMing is more confusing.  Installing offers three versions, ("Website Release", "Public Domain", and "Work in progress" of multiple programs, "Xming", "XMing-portablePuTTY", "Xming-fonts", "Xming-mesa", and "Snapshot Xming".  Once you figure out that the author, quite reasonably, wants a donation for the newer "Website Release" versions, you'll download the "Public Domain" versions for initial testing.  I think that Xming-mesa is only for high-performance OpenGL type stuff, so I skipped that.

Unlike the remarkably simple PuTTY, You'll see a lot of .exe files in the Xming folder.  Unlike PuTTY, where double-clicking always brings up a dialog to set prefs and show you that something is happening, Xming has a two step process.  First the XLaunch.exe launcher,  used to set prefs, then a separate Xming.exe which actually runs the X Server.  Double clicking on Xming does not bring up a dialog.  Instead, you should see an X icon in the Windows tool bar to show that it is running successfully.  But, at least at first, you really want to run XLaunch first to set prefs.  On the first page, there is, once more, a somewhat mysterious "Display number" entry.  The examples give it a number but the docs suggest that leaving it blank may be better. However, in my version, I couldn't leave it blank.  So I used 0.
Xming comes with plink.exe, which is some sort of command-line version of PuTTY with the world's worst user interface.  Double click on it, and you'll see a large dialog panel PuTTY Link:Usage with all the options.  Seems like a good idea.  Until you try to use it.  Let's say I see a hard-to-type option I want to use, like -pgpfp.  You can't copy and paste.  What's worse, you can't even read the option and type it, cause the freaking dialog is modal!  You have to memorize (or write down) the options, then close the dialog.  Somebody went to extra work to create this dialog which is far less useful than the simple, time-tested "just print it to stdout" style.

So, ignoring plink, let's continue.  Run XLaunch and click through Next on every page.  Save if you want.  Then launch Xming and verify that you see an X icon in the task bar.  You can right click and view the log file.  Do so - it's useful till you get going.  Then launch PuTTY, entering the IP address of the Linux box and setting up X11 forwarding.  You should see a terminal window with the IP address of the Linux box asking you to login.  Do so.

Try to start an X-Window command, like xclock &.  You'll get an error message along the lines of "Can't open Display".  Now, this is a remarkably poor and confusing error message.  What is really should say is something like Can't open $DISPLAY "", with the quotes around your $DISPLAY variable.  That's because your $DISPLAY variable isn't set.  You will need the "magic incantation"

export DISPLAY=windowsmachineipaddress:0.0

Where you enter the IP address of the Windows box.  If, like many people, you are using a router with DHCP, you've got to startup a command prompt on the Windows box and type ipconfig -all to get your IP address.  Annoying.

Alas, it still doesn't quite work.  If you look at the XMing log, you'll see something like:

Xming: client 4 rejected from IP ipaddress_of_archlinuxbox}


As noted here, the fix is to go to the Xming shortcut and add -ac at the end of the command line, or to add the IP address of the Linux box to the X0.hosts file.  Which may be tricky right now cause the Xming process has the file open.  I added the -ac option and finally, finally, I can get an xclock and xeyes on the Windows display.  Victory!
By contrast, VNC is a piece of cake.  I used TightVNC.  Installing is simple.  For my purposes, you definitely need to install the viewer.  The server (from your Windows machine) is optional.

To use the viewer, run it, type in the address of the server, and it pretty much just works.  The main thing I changed is under the Options... dialog, where I set Local Cursor Shape to "Normal Arrow".  The dot cursor was too small for my taste, YMMV.
Wednesday, December 28, 2011
Adventures in Ubuntu and Hadoop Part 2
Continuing from the previous post, where I eventually managed to wrestle Ubuntu Linux, the Oracle JDK 6, and Eclipse, onto an old desktop computer. The next step is to install Hadoop. Or is it? There's some more prep work that needs to be done sometime, as noted in this excellent article, with the exact title I want, "Running Hadoop On Ubuntu Linux (Single-Node Cluster)". It's looking like I haven't done much so far, only accomplishing the first of about 30 labors (which is about three times more than Heracles).
Adding a hadoop group and hduser was easy
ssh localhost
The article then recommends disabling IPv6 via a simple addition to the /etc/sysctl.conf file. Done. Well, minor glitch, by that point I was logged in as hduser, not the main user and I got myself confused on sudo stuff. For simplicity, opened up a new terminal window as the boss-man and did the editing, adding these lines to the end of /etc/sysctl.conf.
#disable ipv6 net.ipv6.conf.all.disable_ipv6 = 1
net.ipv6.conf.default.disable_ipv6 = 1
net.ipv6.conf.lo.disable_ipv6 = 1
Next step? Well, before installing Hadoop, I really should verify that the object of this exercise works: that I can see the Ubuntu "workstation" from my Windows7 laptop. So, at least one more prepatory step, installing a X server (stupid name, should be an X client) on the laptop. Looks like Xming is the best option. More next session!
One final small step - configure my Ubuntu to not use DHCP for it's address, so that it's constant behind our router/firewall. The trick I use (which I read somewhere else, not my idea) is to assign it a number less than 100, cause most routers start assigning at 100 and up. Our printer is at 10, so in the best BASIC/FORTRAN line numbering style I'll leave the 10s for more printers, and start Ubuntu at 20.
Adding a hadoop group and hduser was easy
$ sudo addgroup hadoop $ sudo adduser --ingroup hadoop hduseras was generating a SSH key, with a but...user@ubuntu:~$ su - hduser hduser@ubuntu:~$ ssh-keygen -t rsa -P ""But... SSH wasn't installed on my system yet. The Ubuntu Software Center graphical program wasn't very useful - it just showed clients when I searched for SSH. But found this post detailing what to do.sudo apt-get install openssh-serverWith this accomplished, the keypair generation worked and I was able to test by logging in with no password viassh localhost
The article then recommends disabling IPv6 via a simple addition to the /etc/sysctl.conf file. Done. Well, minor glitch, by that point I was logged in as hduser, not the main user and I got myself confused on sudo stuff. For simplicity, opened up a new terminal window as the boss-man and did the editing, adding these lines to the end of /etc/sysctl.conf.
#disable ipv6 net.ipv6.conf.all.disable_ipv6 = 1
net.ipv6.conf.default.disable_ipv6 = 1
net.ipv6.conf.lo.disable_ipv6 = 1
Next step? Well, before installing Hadoop, I really should verify that the object of this exercise works: that I can see the Ubuntu "workstation" from my Windows7 laptop. So, at least one more prepatory step, installing a X server (stupid name, should be an X client) on the laptop. Looks like Xming is the best option. More next session!
One final small step - configure my Ubuntu to not use DHCP for it's address, so that it's constant behind our router/firewall. The trick I use (which I read somewhere else, not my idea) is to assign it a number less than 100, cause most routers start assigning at 100 and up. Our printer is at 10, so in the best BASIC/FORTRAN line numbering style I'll leave the 10s for more printers, and start Ubuntu at 20.
Subscribe to:
Posts (Atom)


