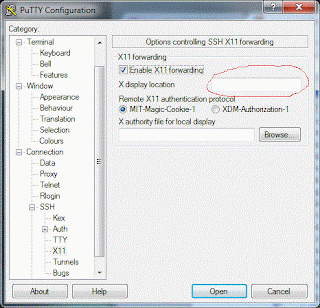
When I used Unix a lot (20+ years ago) I was using X-Windows. I remember when Tom's Window Manager (twm) was hot stuff. So I wanted to run an X "server" (poor choice of terms but that's what they call it) on my Windows laptop. The first step is to download and install PuTTY, a highly-regarded telnet and SSH client. Be sure to get the latest release version 0.61 or higher if you are using Windows 7. PuTTY is pretty simple to use: double click on putty.exe, you'll see a (somewhat complex) dialog for the configuration. And you'll notice that on-line documentation it a bit inconsistent on how to configure it for XWindows. Mainly on the Connection-SSH-X11 page. I left it blank, as many (also see PuTTY docs) suggest.

XMing is more confusing.  Installing offers three versions, ("Website Release", "Public Domain", and "Work in progress" of multiple programs, "Xming", "XMing-portablePuTTY", "Xming-fonts", "Xming-mesa", and "Snapshot Xming".  Once you figure out that the author, quite reasonably, wants a donation for the newer "Website Release" versions, you'll download the "Public Domain" versions for initial testing.  I think that Xming-mesa is only for high-performance OpenGL type stuff, so I skipped that.

Unlike the remarkably simple PuTTY, You'll see a lot of .exe files in the Xming folder.  Unlike PuTTY, where double-clicking always brings up a dialog to set prefs and show you that something is happening, Xming has a two step process.  First the XLaunch.exe launcher,  used to set prefs, then a separate Xming.exe which actually runs the X Server.  Double clicking on Xming does not bring up a dialog.  Instead, you should see an X icon in the Windows tool bar to show that it is running successfully.  But, at least at first, you really want to run XLaunch first to set prefs.  On the first page, there is, once more, a somewhat mysterious "Display number" entry.  The examples give it a number but the docs suggest that leaving it blank may be better. However, in my version, I couldn't leave it blank.  So I used 0.
Xming comes with plink.exe, which is some sort of command-line version of PuTTY with the world's worst user interface.  Double click on it, and you'll see a large dialog panel PuTTY Link:Usage with all the options.  Seems like a good idea.  Until you try to use it.  Let's say I see a hard-to-type option I want to use, like -pgpfp.  You can't copy and paste.  What's worse, you can't even read the option and type it, cause the freaking dialog is modal!  You have to memorize (or write down) the options, then close the dialog.  Somebody went to extra work to create this dialog which is far less useful than the simple, time-tested "just print it to stdout" style.

So, ignoring plink, let's continue.  Run XLaunch and click through Next on every page.  Save if you want.  Then launch Xming and verify that you see an X icon in the task bar.  You can right click and view the log file.  Do so - it's useful till you get going.  Then launch PuTTY, entering the IP address of the Linux box and setting up X11 forwarding.  You should see a terminal window with the IP address of the Linux box asking you to login.  Do so.

Try to start an X-Window command, like xclock &.  You'll get an error message along the lines of "Can't open Display".  Now, this is a remarkably poor and confusing error message.  What is really should say is something like Can't open $DISPLAY "", with the quotes around your $DISPLAY variable.  That's because your $DISPLAY variable isn't set.  You will need the "magic incantation"

export DISPLAY=windowsmachineipaddress:0.0

Where you enter the IP address of the Windows box.  If, like many people, you are using a router with DHCP, you've got to startup a command prompt on the Windows box and type ipconfig -all to get your IP address.  Annoying.

Alas, it still doesn't quite work.  If you look at the XMing log, you'll see something like:

Xming: client 4 rejected from IP ipaddress_of_archlinuxbox}


As noted here, the fix is to go to the Xming shortcut and add -ac at the end of the command line, or to add the IP address of the Linux box to the X0.hosts file.  Which may be tricky right now cause the Xming process has the file open.  I added the -ac option and finally, finally, I can get an xclock and xeyes on the Windows display.  Victory!
By contrast, VNC is a piece of cake.  I used TightVNC.  Installing is simple.  For my purposes, you definitely need to install the viewer.  The server (from your Windows machine) is optional.

To use the viewer, run it, type in the address of the server, and it pretty much just works.  The main thing I changed is under the Options... dialog, where I set Local Cursor Shape to "Normal Arrow".  The dot cursor was too small for my taste, YMMV.

Thanks Lauraine. I've been real busy on some other things lately but hope to get back to Hadoop soon.
ReplyDelete