Saturday, December 31, 2011

Adventures in Ubuntu and Hadoop Part 3

Wherein Rocky and Bullwinkle install PuTTY and XMing to allow X-Windows access to the Ubuntu machine, or, "Maybe I'll use VNC instead".

When I used Unix a lot (20+ years ago) I was using X-Windows. I remember when Tom's Window Manager (twm) was hot stuff. So I wanted to run an X "server" (poor choice of terms but that's what they call it) on my Windows laptop. The first step is to download and install PuTTY, a highly-regarded telnet and SSH client. Be sure to get the latest release version 0.61 or higher if you are using Windows 7. PuTTY is pretty simple to use: double click on putty.exe, you'll see a (somewhat complex) dialog for the configuration. And you'll notice that on-line documentation it a bit inconsistent on how to configure it for XWindows. Mainly on the Connection-SSH-X11 page. I left it blank, as many (also see PuTTY docs) suggest.
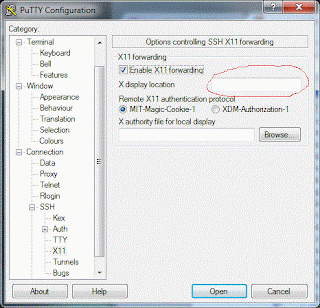


All in all, PuTTY is a great little program.
XMing is more confusing.  Installing offers three versions, ("Website Release", "Public Domain", and "Work in progress" of multiple programs, "Xming", "XMing-portablePuTTY", "Xming-fonts", "Xming-mesa", and "Snapshot Xming".  Once you figure out that the author, quite reasonably, wants a donation for the newer "Website Release" versions, you'll download the "Public Domain" versions for initial testing.  I think that Xming-mesa is only for high-performance OpenGL type stuff, so I skipped that.

Unlike the remarkably simple PuTTY, You'll see a lot of .exe files in the Xming folder. Unlike PuTTY, where double-clicking always brings up a dialog to set prefs and show you that something is happening, Xming has a two step process. First the XLaunch.exe launcher, used to set prefs, then a separate Xming.exe which actually runs the X Server. Double clicking on Xming does not bring up a dialog. Instead, you should see an X icon in the Windows tool bar to show that it is running successfully. But, at least at first, you really want to run XLaunch first to set prefs. On the first page, there is, once more, a somewhat mysterious "Display number" entry. The examples give it a number but the docs suggest that leaving it blank may be better. However, in my version, I couldn't leave it blank. So I used 0.
Xming comes with plink.exe, which is some sort of command-line version of PuTTY with the world's worst user interface.  Double click on it, and you'll see a large dialog panel PuTTY Link:Usage with all the options.  Seems like a good idea.  Until you try to use it.  Let's say I see a hard-to-type option I want to use, like -pgpfp.  You can't copy and paste.  What's worse, you can't even read the option and type it, cause the freaking dialog is modal!  You have to memorize (or write down) the options, then close the dialog.  Somebody went to extra work to create this dialog which is far less useful than the simple, time-tested "just print it to stdout" style.

So, ignoring plink, let's continue. Run XLaunch and click through Next on every page. Save if you want. Then launch Xming and verify that you see an X icon in the task bar. You can right click and view the log file. Do so - it's useful till you get going. Then launch PuTTY, entering the IP address of the Linux box and setting up X11 forwarding. You should see a terminal window with the IP address of the Linux box asking you to login. Do so.

Try to start an X-Window command, like xclock &. You'll get an error message along the lines of "Can't open Display". Now, this is a remarkably poor and confusing error message. What is really should say is something like Can't open $DISPLAY "", with the quotes around your $DISPLAY variable. That's because your $DISPLAY variable isn't set. You will need the "magic incantation"


export DISPLAY=windowsmachineipaddress:0.0

Where you enter the IP address of the Windows box. If, like many people, you are using a router with DHCP, you've got to startup a command prompt on the Windows box and type ipconfig -all to get your IP address. Annoying.

Alas, it still doesn't quite work. If you look at the XMing log, you'll see something like:

Xming: client 4 rejected from IP ipaddress_of_archlinuxbox}


As noted here, the fix is to go to the Xming shortcut and add -ac at the end of the command line, or to add the IP address of the Linux box to the X0.hosts file. Which may be tricky right now cause the Xming process has the file open. I added the -ac option and finally, finally, I can get an xclock and xeyes on the Windows display. Victory!

By contrast, VNC is a piece of cake.  I used TightVNC.  Installing is simple.  For my purposes, you definitely need to install the viewer.  The server (from your Windows machine) is optional.

To use the viewer, run it, type in the address of the server, and it pretty much just works. The main thing I changed is under the Options... dialog, where I set Local Cursor Shape to "Normal Arrow". The dot cursor was too small for my taste, YMMV.


Wednesday, December 28, 2011

Adventures in Ubuntu and Hadoop Part 2

Continuing from the previous post, where I eventually managed to wrestle Ubuntu Linux, the Oracle JDK 6, and Eclipse, onto an old desktop computer. The next step is to install Hadoop. Or is it? There's some more prep work that needs to be done sometime, as noted in this excellent article, with the exact title I want, "Running Hadoop On Ubuntu Linux (Single-Node Cluster)". It's looking like I haven't done much so far, only accomplishing the first of about 30 labors (which is about three times more than Heracles).

Adding a hadoop group and hduser was easy
$ sudo addgroup hadoop $ sudo adduser --ingroup hadoop hduser
as was generating a SSH key, with a but...
user@ubuntu:~$ su - hduser hduser@ubuntu:~$ ssh-keygen -t rsa -P ""
But... SSH wasn't installed on my system yet. The Ubuntu Software Center graphical program wasn't very useful - it just showed clients when I searched for SSH. But found this post detailing what to do.

sudo apt-get install openssh-server
With this accomplished, the keypair generation worked and I was able to test by logging in with no password via

ssh localhost

The article then recommends disabling IPv6 via a simple addition to the /etc/sysctl.conf file. Done. Well, minor glitch, by that point I was logged in as hduser, not the main user and I got myself confused on sudo stuff. For simplicity, opened up a new terminal window as the boss-man and did the editing, adding these lines to the end of /etc/sysctl.conf.

#disable ipv6 net.ipv6.conf.all.disable_ipv6 = 1
net.ipv6.conf.default.disable_ipv6 = 1
net.ipv6.conf.lo.disable_ipv6 = 1

Next step? Well, before installing Hadoop, I really should verify that the object of this exercise works: that I can see the Ubuntu "workstation" from my Windows7 laptop. So, at least one more prepatory step, installing a X server (stupid name, should be an X client) on the laptop. Looks like Xming is the best option. More next session!

One final small step - configure my Ubuntu to not use DHCP for it's address, so that it's constant behind our router/firewall. The trick I use (which I read somewhere else, not my idea) is to assign it a number less than 100, cause most routers start assigning at 100 and up. Our printer is at 10, so in the best BASIC/FORTRAN line numbering style I'll leave the 10s for more printers, and start Ubuntu at 20.

Sunday, December 25, 2011

Adventures in Ubuntu and Hadoop Part 1

One of my goals for 2012 is to learn Hadoop. So I want to install it somewhere. I have a nice Windows 7 Laptop used for most development. Hadoop only "sortof runs" on Windows, for basic development only, and then only with Cygwin. Now, I know many people who love and swear by Cygwin, but I'm in the other camp - in admittedly limited experience, I disliked and swore at Cygwin. Besides, I've wanted to play with Linux for a while anyway. Twenty years ago I knew how to use vi and ls. How hard could it be? And, in reorganizing / swapping offices with my wife, that freed up an old 160 GB disk and some RAM to upgrade my 7 year old desktop, a Gateway 503GR. So, why not install Linux on the 2nd drive, and then Hadoop?

The nice thing about Linux is that you can spend weeks deciding which "distro" is best. Fortunately, some Googling revealed that, for my old machine, Ubuntu definitely ran, and Ubuntu got good reviews as relatively "easy". I grabbed a book from the local library (Ubuntu Linux by Willian von Hagen) and got started.

Downloading the ISO image for Ubuntu 11.10 to my Windows machine was pretty easy. Fortunately I already had a utility program to burn ISO images to CD. So far, so good. Transferring the hardware was easy too. My 1G RAM and 160GB disk was quickly upgrded to 2G and 2x160GB. My plan was to keep Windows XP on the original disk and install Linux on the 2nd one.

O.K., boot up and hit F2. Well, the first try my timing was off, but I did notice that Windows saw the new RAM and disk. Second time I got the timing right and opened in "Try Ubuntu" mode. I wanted to look at the disks to make sure of which was which. Turned out that disk "b" was the new one. Then clicked install. I got a surprising dialog about "unmounting" the disks, thought a bit, said what the hey and did that. Said to install on disk "b" and everything went pretty smoothly. Except, I noticed that the "look for updates" box was disabled. My network adapter (on the motherboard) is getting cranky, especially after the computer is totally disconnected from AC power. Anyway, it installed fine.

Time to reboot. To my pleasant surprise, the "Grand Unified Boot Loader" (GRUB) worked just as advertised, and I could boot into either Linux or Windows. Ubuntu recognized my NVidia card and I was able to get both monitors configured quickly. Just needed some playing with the power cable to trick the network adapter into working.

So far, so good. Now, to install Java. Right now Java 6 is very well established, at update 30, while Java 7 is pretty new. I'm not using any of the new Java 7 yet. Java SE 6 update 30 it is. Now the trouble begins. Now I'm sure that somebody knows why, (here's a link) but Ubunti and the "official" Oracle Java JDK don't get along. In that Ubuntu doesn't feature it in their Software Center or Synaptic Package Manager. They do feature the Open JDK stuff, which has some mixed reviews. Besides, that would be too easy - what would I learn with that? I downloaded the official .bin package, not the rpm.bin. Moved it deep in the bowels of /opt, then ran it (eventually) via

sudo ./jdk-6u30-linux-i586.bin

Geez, you need to type sudo a lot! But java -version didn't work. And my feeble attempts to add java/bin to the PATH didn't seem to work either.

The magical incantation, found by Googling, was:

/usr/bin$ sudo update-alternatives --install /usr/bin/java java /opt/java/32/jdk1.6.0_30/bin/java 100
then
sudo update-alternatives --config java

The first command will put a java link in /usr/bin that points to /etc/alternatives/java, which is a link that points to the actual stuff in /opt. Anyway, this worked, and java -version happily printed out java version "1.6.0_30"

BTW, I since found a more complete web site with the gory details. Looks like I still have a little work to do.


Before moving on to Hadoop (which will be the subject of a future post) I thought I should install Eclipse. Downloaded the latest, eclipse-java-indigo-SR1-linux-gtk.tar.gz, put it into /opt/eclipse, and the typed my first tar xzf in years.

tar xcf ec*


Drat, need yet another sudo,

sudo tar xzf ec*
.

Worked! A little more research found a simple script to put into /usr/bin to launch it. Create /usr/bin/eclipse with:

#!/bin/sh
export ECLIPSE_HOME="/opt/eclipse/eclipse"

$ECLIPSE_HOME/eclipse $*

Viola! I'll probably want to add some settings for memory usage, but, for now, Eclipse started up and asked for me to Select a workspace etc... It is pointing at the correct JRE. And a quick "Hello World" worked.

Stay tuned for the next exciting episode, "Ricky and Bullwinkle wrestle with Hadoop", or, "How many more times will I forget the sudo wrestler?". :-)

Wednesday, December 14, 2011

Testing Error Handling in Complex Code - The "Error Injection" Principle

I'm working with some legacy code, adding cool new features, many involving multi-threading.  But testing the error handling is difficult. The code is very complex for unit tests, and because it was written many years ago it isn't really structured for them.  I can step through in the debugger and change some variables to cause NPEs, etc, but that's really slow and tedious.

So I developed a fairly simple class, called TestSimulator, to do "Error Injection".  :-)  Basically, at key parts in your code you insert one line of code

TestSimulator.doCommand(someUniqueStringRepresentingYourLocation);

e.g.

TestSimulator.doCommand("MyClassName.someMethodName-complete");

TestSimulator has a boolean enabled, plus a HashMap.


It uses the unique string to look up a command, which is a simple DSL for what to do.  It currently supports


throw:exceptionClass
throw:exceptionClass(message)
sleep:milliseconds
interrupt:


All of them do pretty much what you'd expect.  For example, you could say throw:java.lang.ArithmeticException(Too many foobars).  (no quotes)  Note that interrupt: does not throw an Interrupted exception, use throw: for that, it calls Thread.currentThread().interrupt(); 
so you can test if you are properly checking that flag later.

Here's the source code.  Error handling within the class is a bit primitive.

public class TestSimulator {

 public static boolean enabled = false;
 
 /**
  * Commands have the form command:value
  * Currently we support
  *  throw:exceptionclass,     e.g. throw:java.lang.ArithmeticException
  *  throw:exceptionclass(message), e.g. throw:java.lang.ArithmeticException(Too many foobars)
  *  sleep:milliseconds,      e.g. sleep:1000
  *  interrupt:
  */
 public static final HashMap<String, String> sCommandMap = new HashMap();


 /**
  * Executes the command for the given key
  *
  * @param key
  * @throws Exception  the most common case throws some form of Throwable
  */
 public static void doCommand(String key) throws Exception {
   String command = sCommandMap.get(key);
   if (!enabled || command == null)
    return;
  
   System.out.println("testSimulator.doCommand " + command);
  
   if (command.startsWith("throw:")) {
    Throwable t = makeThrowable(command.substring(6));
    if (t instanceof Exception)
      throw (Exception)t;
    else if (t instanceof Error)
      throw (Error)t;    
   }
   else if (command.startsWith("sleep:")) {
    long milliseconds = Long.parseLong(command.substring(6));
    Thread.sleep(milliseconds);
   }
   else if (command.startsWith("interrupt:")) {
    Thread.currentThread().interrupt();
   }
  
   else {
    throw new IllegalArgumentException(key + " = " + command);
   }
 }

 // utilities
 static Throwable makeThrowable(String classNameAndMessage) {
   String message = null;
   String className = classNameAndMessage.trim();
   int paren = classNameAndMessage.indexOf('(');
   if (paren > 0) {
    message = classNameAndMessage.substring(paren+1, classNameAndMessage.length()-1);
    className = classNameAndMessage.substring(0, paren).trim();
   }
   try {
    Class<? extends Throwable> clazz = (Class<? extends Throwable>) Class.forName(className);
    if (message == null)
      return clazz.newInstance();
    else
      return clazz.getConstructor(String.class).newInstance(message);
   } catch (Exception e) {
    e.printStackTrace();
    return null;
   }
 }


To actually use this class, I've been writing small little mains in the classes I am primarily interested in testing.  There's probably a better way, but this works for now.  e.g. if I am testing a class called CalculatePI, it would have a main looking like:


public static void main(String[] args) throws Exception {
      
   TestSimulator.enabled = true;
      
   // modify the following as desired
   TestSimulator.sCommandMap.put("CalculatePI.calculateThis1", null);
   TestSimulator.sCommandMap.put("CalculatePI.longCalculationStep3", "interrupt:");
   TestSimulator.sCommandMap.put("CalculatePI.longCalculation-complete", throw: java.lang.ArithmeticException(Failed to converge)");
   
   // launch the big fancy app as appropriate here... 
   MainClass.main(new String[0]);
}